How to grow your own food indoors, part 3: Microgreens
The third and final blog in our series about how to grow your own food indoors will cover growing microgreens. Catch up on earlier posts in the series to learn how to grow your own herbs and green onions . Note: growing microgreens is more technical than the previous blogs in the series due to necessary steps that reduce potential health risks.
Join us for the rest of this 3 part series on how to grow your food indoors:
What are microgreens?
Microgreens are baby plants harvested early on during the plants’ growth. Microgreens are harvested right after the first “true leaf” sprouts, in between the “sprouts” stage of the plant and the “baby greens” stage.
Microgreens are great for flavor and texture. You can add them to salads, sandwiches, or use them as a garnish on top of soup or an entrée. They typically have a similar flavor as the mature version of the plant. For example, mustard microgreens will taste bitter, similar to full-grown mustard greens. Common microgreens are [ 1 ]:
• Broccoli • Basil • Red cabbage • Radishes • Dill • Basil • Arugula • Beets • Mustard greens
We’ll show you how to grow and harvest microgreens in your home in about 1-2 weeks!
Did you know? Microgreens can be more nutritious than their mature plant version! For example, arugula microgreens offer 45 mg of vitamin C while the same amount of its adult counterpart only has 15 mg.[ 2 ] That means that a cup of arugula microgreens could have more vitamin C than a cup of mature arugula.
Quick instructions:
1. Purchase microgreen “sprouting seeds” from suppliers that can certify that their seeds are pathogen-free (can be found online) AND treat the seeds using this method to reduce potential pathogens. 2. Gather a wide container with holes in the bottom. For example, you can poke holes in a plastic salad container (see below for a picture). 3. Spray potting soil or mix with water to make the soil damp. You can also put soil in a bowl and mix it with a little water from the sink. 4. Cover the bottom of the container with 1-2 inches of soil. Flatten it gently with the back of a spoon so the soil is even. Try not to push too hard and compact the soil. 5. Scatter the microgreen seeds evenly on top of the soil. Microgreens do not need a lot of room to grow, so you can use a lot of seed and scatter them close together. Press gently into the soil using the spoon again. 6. Next, spray the soil with a mister and cover the container with a clear lid or plastic wrap until the seeds are sprouted. You do not need to cover the seeds with soil. 7. Microgreens need about 6-8 hours daily of direct sunlight. They may need more during winter months. Place the container in a windowsill or on a tabletop that gets plenty of direct of sunlight. 8. You will want to water your microgreens from below. This is because watering the seeds or plants directly can encourage plant diseases to develop and they may fail to grow. Instead, place your container in a tray with some water in it. Add new water as needed (e.g., if your soil is getting dry or your microgreens begin to droop). 9. Around day 3, you may notice little fuzzy growths. These are the beginning of your sprouts. 10. Once seeds have sprouted and you have little shoots coming out of the soil, remove the cover and continue to add water to your tray as needed. 11. In about 1-2 weeks, your microgreens will be ready to cut and harvest!
Step-by-step instructions (with pictures!):
We, the Food Talk team, grew our own microgreens to help show you get started. Follow along below!
Gather your microgreen seeds, potting soil or mix, and a container with holes in the bottom. We used an empty, clean plastic salad container.
Safely poke holes in the bottom of your container if it doesn’t already have them.
Spray potting soil or mix with water to make the soil damp. You can also put soil in a bowl and mix it with a little water from the sink. We went with the second option here.
Cover the bottom of the container with 1-2 inches of soil.
Flatten it gently with the back of a spoon so the soil is even. Try not to push too hard and compact the soil.
Make sure to use microgreen “sprouting seeds” from suppliers that can certify that their seeds are pathogen-free (can be found online) AND treat the seeds using this method to reduce potential pathogens. Regular microgreen seeds from the store may not have been tested for pathogens, such as E. coli.
Scatter the microgreen seeds evenly on top of the soil. Press gently into the soil using the spoon again. Microgreens do not need a lot of room to grow, so you can use a lot of seed and scatter them close together. Press gently into the soil using the spoon again. Our microgreen packet included beet, cabbage pak choi, kohlrabi, broccoli, and radish seeds.
You will want to water your microgreens from below. This is because watering the seeds or plants directly can encourage plant diseases to develop and they may fail to grow.[ 1 ]
Instead, place your container in a tray with some water in it. Water will soak into the soil through the holes in the container. Add water to the tray based on how moist the soil is or how droopy your microgreens are. If your soil is getting dry or your microgreens are drooping, you need to add more water.
Microgreens require about 6-8 hours of direct sunlight a day, maybe more during winter months. Place the container in a windowsill or on a tabletop that gets plenty of direct of sunlight (watering tray not shown).
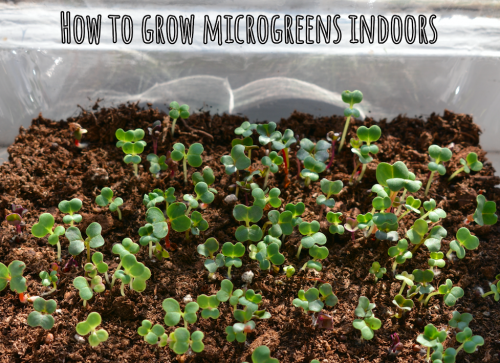
Around day 3, you may notice little fuzzy growths. These are the beginning of your sprouts.
We saw good growth as early as day 5! They were green and purple and about a half-inch tall.
Our greens started growing at an angle towards the sun. To fix this, we simply rotated the container so that the greens were facing away from the sun. When they turn back towards the sun, they’ll correct themselves and stand upright. Rotate as desired.
Continue to add water to the tray as needed.
If mold begins to develop on your soil, check that you are watering properly.[ 2 ] You may need to increase airflow or decrease humidity. Throw out any greens that continue to grow mold even with these changes.
In about 1-2 weeks, your microgreens will be about 1 in tall and ready to cut and harvest! Make sure you use clean scissors or plant shears to cut your microgreens just above the soil. Do not eat the roots. It’s best if you eat the microgreens as soon as possible, but you can store them in a clean jar in the refrigerator.
We harvested on the seventh day because we did not provide our microgreens enough water and they started to droop. More water would have perked them right up!
Remember, microgreens are excellent in salads or sandwiches. Sprinkle them on top of your entrée for some added flavor and nutrition!
Learn more about growing plants indoors here . Having trouble growing your indoor plants? This resource can help. You can also bring your questions and photos of the plants you’re concerned about to your nearest Extension office . They’d love to help!
Written by Taylor Newman, Ph.D. Candidate | Edited by Laurel Sanville, MS, RDN, LD and Laura Ney, Ph.D., Agriculture and Natural Resources (ANR) Agent for Athens-Clarke County
[1] North Carolina Cooperative Extension
Original photo sources: Taylor Newman Sprouts for graphic Microgreens for graphic Baby greens for graphic